
THE PERFECT LEAFY GREEN SALAD! AND THOUGHTS ON FOOD PHOTOGRAPHY 2 (V+, V, R, P, GF, GRF, NF)

WARNING: This is another looooong blog entry, mainly about food photography and food styling. So if you're just here for the delicious Leafy Green Salad recipe – no offence taken – just scroll way down to the bottom of this post and you'll find what you're looking for :).
You still here? Great, cuz it's a blog post I've been feeling really excited about sharing with you. But first the backstory: I'm a complete total first born. I think as a first born you always feel responsible and you always want to make things better for everyone. So if someone comes to me and tells me their problem – I go into first born mode. I'm a sympathetic listener, sure, but mainly in the back of my head I'm thinking: OK, this person is upset/sad/frustrated, what can I do to make everything alright? How can I solve their problem and make them smile? Cuz that's what you do as a first born, you fall into that psydo parenting role, right? At least I do.
So what's that got to do with food photography? Well, loads actually. See this time around I was the one with the problem that needed fixing. I just got so bored of hearing myself moan about not knowing how to take good enough pictures (BTW I don't feel that way anymore, but at the time I did ;)). So, I thought about all the ways I could make things better and solve my problem. Ah! Attend a food photography and food styling workshop of course...

As it happened, I stumbled across one through sheer coincidence and signed up, quite on a whim. It was the best decision I ever made. The workshop was held at uber-stylish Lyle's in East London and run by mega talented Jo Yee and Sarka Babicka, both professional London-based food photographers and bloggers. They also roped in Olia Hercules, a former head chef at Ottolenghi's (I KNOW, THE Ottolenghi) and now published cookbook author and food stylist in her own right. The three women were very generous in sharing their knowledge and experience as well as giving us lots of opportunity to practice our food photography skills. Consequently, it was a wonderful experience.
So here's what I learned on the day with key messages underlined and written in bold :):
1. LIGHTING IS EVERYTHING – I'd read so much about how light affects food photography. But I never quite knew how it worked and why light made the food feel and look a particular way. More importantly, I didn't quite know how to control and manipulate the light to create the mood I was after.
It was great to shoot in a completely different space and move around the food in a way that I normally don't have the chance to. Then take a picture at every different angle and compare. It was fascinating how the food looked different with side or backlight, neither of which I normally use. Jo also encouraged us to move a little bit further away from our light source. Meaning – most people, me included – tend to take pictures very close to the window/light source, but Jo was suggesting moving the food a foot or two away from the window and then seeing what happened. I'd always been too frightened to do that. But actually it created a different feel to my images, which I really liked.
My own kitchen is flooded with light you see from lots of different light sources. It's why many of my pictures are over exposed. I like that look, but not always and the workshop gave me the confidence to pull slightly away from my light sources as well as try and take pictures at different times of the day and in different rooms in the house, thereby gaining more control of my light source and creating different moods.
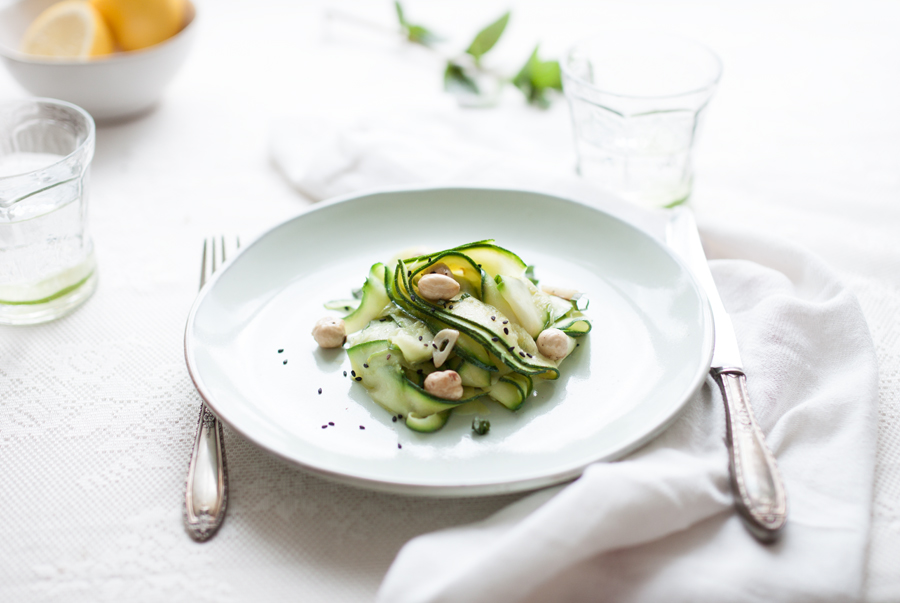
So here an example of a courgette salad picture I took exactly a year ago and a picture of the same salad I took following the workshop. Same salad, complete different look. The first one was taken next to a window and the sun was right on it, which is why some parts are over exposed and others aren't lite at all. The other one was taken on a cloudier day with backlight which I very deliberately chose for this shot. It's just much calmer and simpler and understated, which is what I wanted. (You can see more updated pictures of the delicious warm courgette salad and get the recipe here).

2. PRACTICE AND PATIENCE – I had this idea in my head, that professional food photographers just see food. Take one shot. Get it right immediately. And call it a day. Compared to the rest of us who take 100 shots and can only find 5 mages we like. Nope. It's not true. They experiment with things all the time, just like us. They move props. Then reposition the food. Change the angle at which they are shooting and try again. Because there is no magic formula and you just need to practice and have lots of patience. It's part of the process and the process is fun.
Normally, I'm in such a rush to get my pictures taken really quickly because the food I photograph is the food we actually eat. But it was really encouraging to see that it is normal that it takes time to take a great picture, no matter how good you are. That made me feel better about my own trials and errors :)
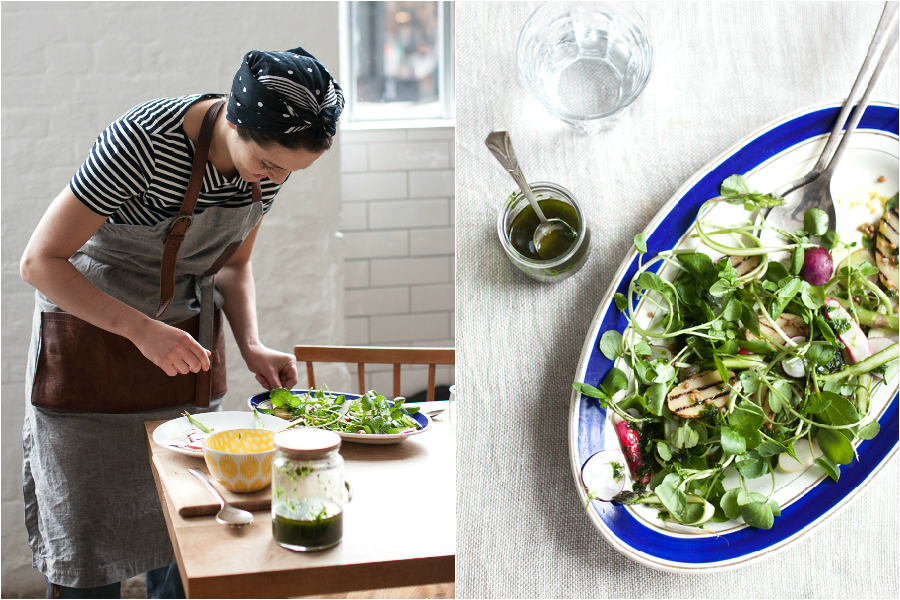
Example? This was us styling the salad on the day. You see how we moved the leaves around and how one image looks a bit neater than the other? Whereas at home I just put the food in one position and don't bother playing around with it. Mistake! So I'm now setting some food aside specifically to photograph, giving me the time I need to play around with things and get the shot I want, whilst hubby and son happily munch away on the rest of the food :)

Good Not so good
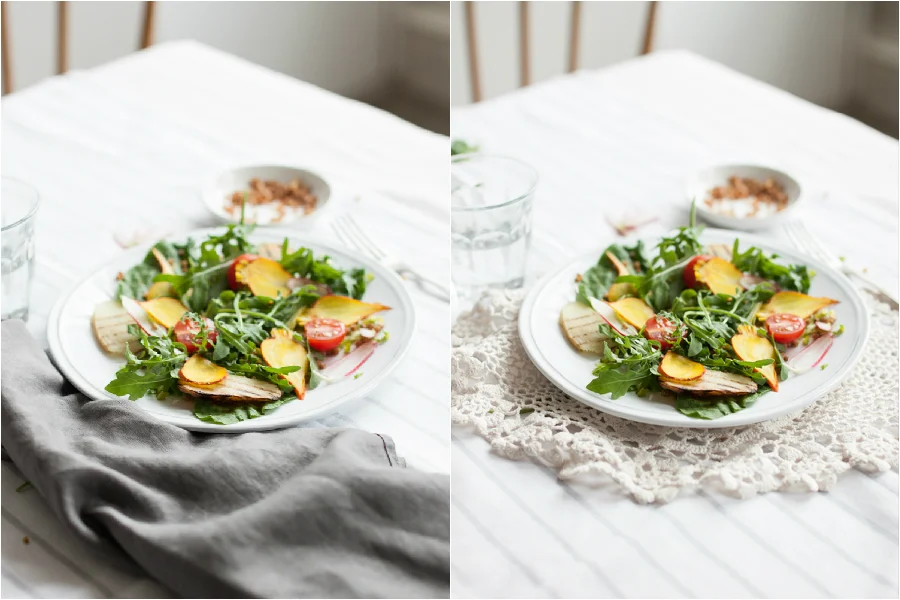
3. BE CLEAR IF YOU WANT TO PHOTOGRAPH WHAT IS OR WHAT YOU WANT IT TO BE – What on earth am I talking about? I'll take a salad I photographed last year to show what I mean. A perfectly honest salad. What do you do? You put it in a salad bowl. Toss it around. Serve it. That's what I did and that's what I photographed. Completely genuine. I think it looks vibrant, but you can't actually see the different elements in the salad and it looks a bit disorganised.

Before After
In the second image I use the same ingredients, but I've styled it. Sure I don't actually eat like this at home, where things are pretty uncomplicated. But that doesn't always look so good on a blog post or on an instagram feed. So I edited and styled it to make it more appealing, showing what the salad is capable off rather than how we'd actually eat it. Make sense? (You can see more updated pictures and get the recipe for the exotic kale salad here).
Is one image better than the other? Not necessarily. It's about what you want to convey. If you want to show how things are and 'keep it real' than the former image is just fine. If you want to showcase the food to the best of its capacities and turn your instagram feed into a gallery of the most delicious healthy food ever, than the latter is the way forward. I know I want the latter and I felt Jo, Sarka and Olia gave me the permission and confidence to go with a more thought through look. It's ok to edit and style and carefully choose what you're going to share :). It works for the pros, so I think I'll make it work for me too ;)
4. LAYERS, TEXTURES, COLOURS AND PROPS – I can't begin to tell you how much fun it was to have a selection of backdrops available, bowls, cutlery, kitchen towels and stunning looking ingredients (did you see that crate of fruit and veg at the beginning of this post. Amaze, right?). Though I don't think you need so many props to make a food blog work, it does help to have a handful of simple and beautiful backdrops and props. Buy key pieces that are YOU and play around with them. I only actually have a few plates (mainly white or off white) and towels, which I use again and again.
Example? Here you can see the same salad styled differently. We ultimately went for the softer, lighter more feminine look on the right. Which do you prefer? Isn't it interesting what a simple cloth can do?
Before After
But it is not just about the props. The food can also bring in layers, colours, textures and interest. There is nothing wrong with an iceberg lettuce salad with white onions and olive oil, but it'll look a bit naff on a blog post. Whereas using ingredients that create movement and contrast are so beautiful to photograph, interesting to look at and utterly delicious to eat. Olia demonstrated this point really beautifully with the salad she styled. Lots of contrasting colours and textures and a Ukrainian plate that just worked perfectly. This point feeds into the last – do you really need to eat different coloured beetroot and differently shaped radishes? No, but it will taste scrumptious, be fun and look fabulicious.

This list of lessons learned is by no means all we talked about, but these were the key messages I took away from the day that I really wanted to share with you :). Now, I know that I'm not an expert after just one class and a year of blogging, but for those of you who feel stuck, I do hope this was helpful and that it will go some way in taking your food blog from 'good' to 'super' (ah back into first born mode...). I myself am so inspired by Jo, Sarka and Olia to keep working hard at making this the best plant-based blog I can and to keep pushing myself in all elements of food blogging.
So what's in store for The Little Plantation and my food photography? Well, I'd love to learn to use a reflector and see what that does. I'm also so keen to learn to use a tripod. Would be awesome to photograph more action shots with myself as the hand model :). I'd love to try and take pics on the go with a phone. Never done that. And finally, I'd love to get a better grip of post processing – thinking about filters and how to use them to create my own look etc. So much to learn...
Anyways, if you'd like to read more about the day, please check our Ceri's, Charlotte's and Jo's blog posts too. Jo even shot a little video. It's so cool. And if you'd like to see more of my pictures, please do follow along on iInstagram :)
Thank you all for reading this long, long post. I hope it's been fun and helpful.
THE PERFECT LEAFY GREEN SALAD (V+, V, R, P, GF, GrF, NF)
First there's me lecturing on food photograhy and now I'm claiming to be able to make the perfect salad? I know, I might sound over confident today, but there is method in the madness.
There is of course no 'perfect' salad, but I hope I can give you some ideas of how to create your perfect salad, putting into practice what I learned at the workshop and know about cooking. I've put in bold what we used for our salad displayed here, but feel free to create your own.
Preparation Time: 10 minutes but varies depending on what you use. Add 15-25 minutes if using cooked grains and up to an hour if using roasted veg
Serves: See below for details and suggestions
Ingredients:
THE 'GREEN' LEAVES
1-2 handfuls per person
Beetgreens
Lamb's lettuce
Kale (dinosaur, curly, etc.)
Rocket
Spinach
Watercress
Romaine Iceberg
Chard
Bok choy
THE ADDED COLOUR AND TEXTURE
1-2 tbs per person
Some thinly sliced (baby) beetroot
Some thinly sliced radishes
Croutons
Baby tomatoes
Thinly slices cucumber
Cooked grains (quinoa, buckwheat, etc.)
Olives
Finely chopped beetgreen stems
Nuts or seeds
Cooked potatoes, thinly sliced
Cooked legumes (chickpeas, kidney beans, etc.)
Chopped fruits (pomegranate seeds, strawberries, mango, dried fruit etc.)
THE ADDED FLAVOUR
1/4 - 1/2 handful per person
Parsley
Basil
Dill
Mint
Sprinkle of paprika powder
Coriander
Chilly flakes
Tarragon
Roasted veg (eggplant, sweet potato, garlic etc.)
A boiled egg
Edible flowers
Finely chopped onions
Chives
THE DRESSING
Think about the salad as a whole and what would best fit together.
3tbs oil: olive oil, hazelnut oil, rapeseed oil, etc.
Some crushed cumin or coriander seeds etc.
1tbs acid: juice of lemon, lime or orange, rice vinegar, white wine vinegar, basamic vinegar
1 tbs to make it perfect: honey, maple syrup, miso, tahini, mustard (English, French, Dijon etc.)
Salt
Pepper
OR use a home made pesto sauce, like Olia did
Instructions:
Cook the buckwheat in some water with a pinch of salt. Boil the potatoes in water with a pinch of salt. Then pan fry in griddle pan until you get nice griddle marks (optional).
Wash your greens, beetroot, radishes and chop the beetgreen stems finely. Prepare on a plate with the potato and buckwheat. Drizzle with olive oil and white wine vinager and a sprinkle of salt.
Looking for more salad ideas? Just click here.
And here you can read more about Food Photography.
