
VEGAN PAD THAI + FOOD PHOTOGRAPHY BACKDROPS PART 1 (V+, ChF, GF, NF)

Hi everyone! I can't tell you how excited I am about this week's blog post. Not only am I bringing you an ACE vegan pad thai recipe (so, SO good), but I'm also tackling another major food photography secret - how to create, source and buy FANTASTIC food photography backdrops.
Following this post on instagram and tons of questions on the subject over the past few weeks, I'm well aware that you've been keen to read up on my tips and tricks ;) and truth be told, I'm even keener to share them with you in the hope that they are going to be helpful.
Now a few notes from the outset - if you're just here for the recipe, please scroll all the way down. The recipe IS there somewhere ;). And if you're hoping to learn everything there is to know about backdrops, let me warn you now, I'm breaking this topic up into 4 blog posts as there's quite a bit to say about the matter. So sorry in advance that you won't find all the answers here today. Thing is, I'm well aware my blog posts have been a tad bit too long recently (ooops) and I really don't want to demand too much of your time in one sitting.
Okay, so without further ado....
FOOD PHOTOGRAPHY BACKDROPS PART 1
As some of you know I recently prop styled a commercial shoot and - just as I do at home - my starting point was my backdrop. It's because a backdrop really sets the tone for your picture and can TOTALLY make or break a shoot. Now, I appreciate not everyone has got a big prop house with tons of backdrops a few tube stops away at their disposal, so here some ideas which you CAN recreate at home with ease.
1. Paper
Cost: low/medium/high
Effort: low/medium/high
Storage: easy/medium/a tad more complicated
Availability: 10/10

I know paper seems an odd choice as a 'backdrop' in food photography, BUT it's got soooo much going for it. Firstly, it's really cheap. For example, the newspaper you see above was as a steal at £1 on e-bayl. It's a vintage newspaper, which I TOTALLY love. In turn, the piece of paper with the colourful writing in the image below was free; it was a page in a booklet I got at Borough Market. In the past, I've also held on to exceptionally beautiful packing paper, brown paper bags and regular old newspapers I've picked up as and when. There's also the option of getting fine, textured paper at places like Paperchase (UK). The shot of the tomatoes was taken on such paper ;). Furthermore, I've seen food bloggers use vintage music sheets (please look at this by Bea's Cookbook!), which I think is a FAB idea. You can of course simply use parchment paper as I do below. Granted, I don't use paper THAT often, but it's a lovely backdrop to have because it creates a really informal tone.
Not convinced? Then look at this STUNNING shot here. It's been pinned more than 2000 times and for good reason!

Secondly, there's very little effort involved in sourcing paper. That's because it's all around you. And, unlike some of the other backdrop options, you can use as little or as much of it as you like. For example, in the shot above, I only used the paper to cover a tiny corner of the image. And the parchment paper in the nan pizza image below only plays the second fiddle, though without it the image wouldn't have worked (we tried, it looked awful!). Here another example of paper being used as an accent rather than a full blow backdrop.

Thirdly, and this is really important, if you're an obsessive food blogger like I am and/or prop style or photography food professionally, the you'll love the fact that paper is SO easy to store and mega simple to take to shoots with you. I have a little corner in my prop cupboard dedicated solely to paper (see above) and I'm utterly grateful that paper is foldable, seeing that my prop hording is getting out of hand *blush*.

2. Concrete
Cost: low/medium/high
Effort: low/medium/high
Storage: easy/medium/a tad more complicated
Availability: 10/10
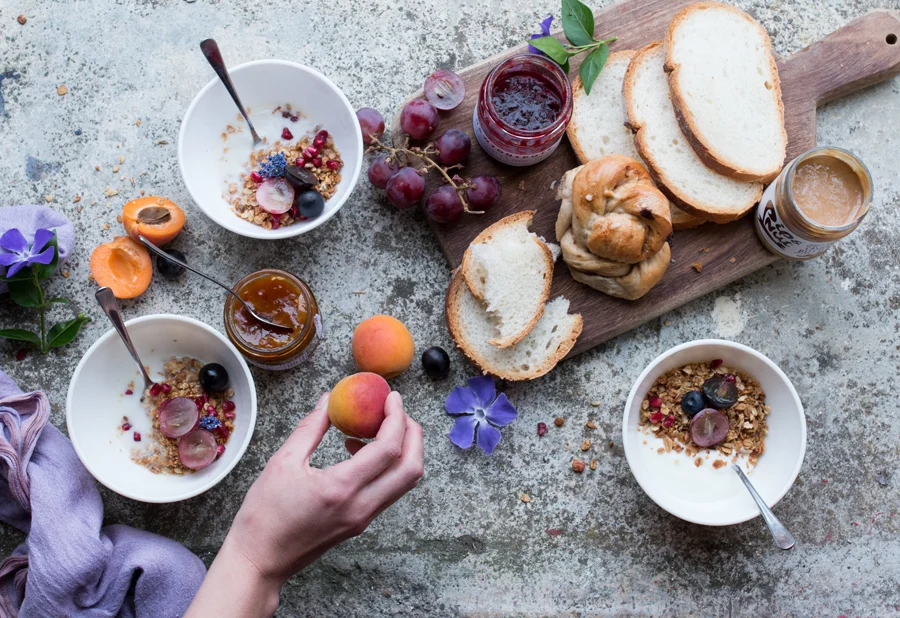
Despite the fact that concrete's environmental credentials are zilch, I must confess that I LOVE working with concrete as a backdrop, especially weathered concrete like the one I shot the breakfast scene on below (taken during our #InFranceWeCook Workshop earlier this year). The way the concrete reflects and retains light is insanely beautiful and the texture is just so interesting. Surprisingly, the backdrop is only a concrete step that led into an artist studio. However, I was so enarmored with this look that I tried to recreate it at home by stealing a concrete slab from my friend's disused garden. In fact the rice and Japanese aubergine scene you can see a little bit further down was taken on said concrete slab.
What I quickly realised though was that the concrete slab wasn't really workable :(. It's soooo heavy to move around. It's why rather sadly I've only ever used it once. However, you might be lucky and have a concrete step/floor in your home or garden? Or - if you are bold and slightly crazy like I am - you might be brave enough to take pictures on concrete floors in restaurants or warehouses like I did below (see the oyster shot which was taken on a painted concrete warehouse floor in Hackney, the Moroccan salad scene arranged in a hallway in a high-rise East London block of flats and the image of the vegetable crate, which I took on a polished concrete floor at this workshop at Lyle's in Shoreditch). Play around, go wild and see what happens when you use concrete. I think you might be surprised :).

Now, I appreciate that not everyone has got a polished concrete floor at their disposal ;), which begs the questions: are there any other, more feasible concrete background options available? Of course there are!
For this week's recipe for example I used a large, thick piece of leftover styrofoam board (about 1metre by 1metre, similar to this stuff here) and mixed together home-made, liquid, self-leveling quick set concrete which the man and the boy in my life roughly 'painted' onto the styrofoam. The aim was to create a very textured look to add depth and interest to the backdrop. I totally love it and what's more, the backdrop is featherlight making it super easy to work with. It's also cheap to make, but does take up a bit of space in my 'studio', so be mindful of that when you make this for yourself.
At the moment I'm lusting big time after a polished concrete backdrop like the one Carolina Ferrer uses here. To achieve that look I aim to take a wooden table top, take the same concrete mixture we used before and polish it as it sets. At this point, I'm unsure how to bring in colour - I'm guessing with paint that's poured into the concrete mixture before applying? Now I use 'I' very loosely here. Of course I mean the hubby with his trusted little helper, my feisty 6-year-old, will make this for me, as I can barely paint a wall, let alone create a backdrop ;).

Do you have any experience of making a backdrop with concrete? Please do share what has worked for you and what you learned. I'd love to hear all about it.
Also if you enjoyed this post, please share it on pinterest, it would totally make my day. And finally please pop by again next week for part 2 of this series where I'll tackle another two backdrop options. See you then.
P.S. Don't forget the recipe below ;)
P.P.S. Find more food photography related posts here and for info on the food styling, photography and yoga weekend retreat I will be running with Twigg Studios please press here.

VEGAN PAD THAI (V+, ChF, GF, NF)
This recipe is a variation of this awesome recipe by the creative genius that is Isa Chandra. My version is perhaps not as traditional as it should be. For example I exchanged the bean sprouts for red cabbage and didn't stir fry the broccoli but instead boiled it very briefly. However the dish is still mega tasty and a total feast for the eye too, which is soooo important in food photography of course ;). I hope you enjoy it as much as I did.
Oh and don't be put off by all the little steps involved in the recipe. It sounds more complicated than it is. I promise!
Total Preparation Time: about 40 minutes
Serves: about 4
Ingredients for the sauce:
2 tablespoons tomato paste
5 tablespoons tamari (gluten-free) or soy sauce
5 tablespoons brown sugar
¼//60ml cup fresh lime juice/juice of 2 limes
1-2 tablespoons Sriracha sauce
1-2 tablespoons organic miso paste
1/4 cup water
Other ingredients:
1/4 of a small red cabbage
4 cups broccoli florettes
a sprinkle of salt
8oz/250g rice noodles
a sprinkle of salt
1-2 tbs vegetable oil (I used brown rice oil)
4 cloves garlic, chopped finely
Ingredients to garnish:
2 scallions/long onions, chopped finely
a small handful of cilantro/coriander, chopped, leaves only
1-2 handfuls of crushed peanuts (unsalted if possible)
2 limes, cut in wedges to serve
a sprinkle of black sesame seeds
Instructions:
First make the sauce by mixing all the ingredients together really well. Once done, set aside.
Then wash and finely chop the red cabbage with a mandolin like this one and set aside.
Next cook the broccoli by placing it in a pot with boiling water and a sprinkle of salt. Cook briefly only - the brocolli should still have a crunch and be a nice vibrant green. You don't want it to go yellow and soggy or have it loose all its goodness! Once done, discart the warm water and quickly bring the brocolli to room temperature by pouring cool water over it. Set aside.
Bring a pot with water and a spinkle of salt to the boil. Once it has boiled, take it off the heat and add the noodles and cook as directed (mine took no more than 3 minutes!). Once done, discart the water immediately and pour over cold water to stop the noodles from overcooking. Set aside.
In a frying pan over a medium heat, pour the vegetable oil and add the chopped garlic. After 1-2 minutes add about 3/4 of the sauce and cook briefly, stirring well. Then add the noodles and stir for 1-2 minutes so that the noodles are warm and covered in sauce. Take off the heat and mix in the brocolli. Serve immediately by topping the noodles with the coriander, long onions, black sesame seeds and crushed peanuts. Serve with a side of red cabbage and lime wedges. Any left over sauce can be served separately for those who want the dish to be extra moist.
Finally, enjoy!
